When executing UI automated tests using some of the test automation frameworks like Selenium or Protractor, often we will find in a situation where we need to check if the element that we identified is available or not i.e determinate the element visibility. Locating a web element and not checking the current state it’s just not enough. We need to make sure that we wait for the element to become visible and of course, do some checks if that element is actually visible or not.
This is often done to make sure that whichever element we locate that we correctly identify, wait for it and do some finalized check if that element is visible, loaded, selected displayed, etc.
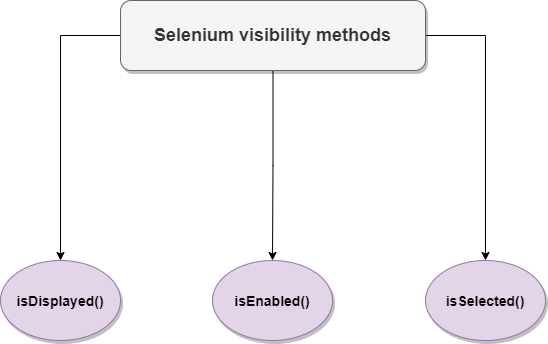
In this blog post, we will dive into the 3 main methods to determine the element visibility using Selenium.
Element visibility methods

isDisplayed()
This method checks if the element is displayed on the webpage or not. If yes, it will return a true value, if not it will return false. In other words, if the element we want to check is visible on the screen, it will return true so that we can successfully fetch its value or it will return false if that element does not appear on the screen at all. The advantage of this method is the ability to avoid parsing the style attribute of the element. Once we fetch the element and wait for a specific time, we can do some conditional checks to verify that the element is really displayed on the screen.
Let’s take a look at the example below using Typescript:
const title = driver.findElement(By.id("title"));
if (!title.isDisplayed()) {
    console.log('The element is not displayed on the screen!');
return false;
}
else {console.log('The element is displayed on the screen!');}return true;
As you can see we’re checking that if the element is not displayed on the screen even after we explicitly waited for some condition to happen, it will return false, otherwise true.
isSelected()
As the name implies, this method is used to check if the element is selected or not. It is mostly used in checkboxes and radio buttons. No matter if the element is selected or not the result will be of boolean type, true for selected, false for not selected. So, it’s a good practice to always check if the checkbox or radio buttons selected after determining the element visibility and before proceeding with the test.
Let’s take a look at the example below using Typescript:
const checkbox = driver.findElement(By.id("checkbox"));
if (!checkbox.isSelected()) {
    console.log('The element is not selected!');
console.log('Selecting the element...');
checkbox.click();
console.log('The element is selected!‘);
return true;
}
From the example above, it’s clear that we’re checking if the element is selected or not. If not, we’re selecting it by using the click() method and returning a true value.
isEnabled()
This method checks if the element is enabled in the HTML or not. It checks the disabled attribute that should be included in the element we want to check. Returns boolean value depending on whether the element is enabled or disabled. If the element does not have the disabled attribute, the method will return true, else false. A good thing to mention here is that you always need to make sure that the attribute is included within the button tag. If the attribute is part of the button’s class name you will need to check the element by its class name value where you need to include the disabled value and do the necessary checks.
Let’s take a look at the example below using Typescript:
<button id="btn-1 "type="button" disabled>Click Here!</button>
const button = driver.findElement(By.id("btn-1"));
if (button.isEnabled()) {
    console.log('The button is enabled and raady to be clicked!');
return true;
}
else {
console.log('The button is not enabled yet!');
retun false
}
The Bottom Line
So, that’s how you check element visibility using Selenium WebDriver. These checks should be included in the test automation framework either as a separate reusable static method or as part of every page-specific element. Regardless, these methods can help you in debugging purposes, provide an additional check before proceeding to the next step in the test execution, and allows us to have more confidence in our code.,
Interested to learn more about automating tests using Selenium? Enroll Now for Selenium Certification Training By Edureka and increase your chances to get hired by Top Tech Companies.
Share This Post
Latest Post
- Test Analyst’s Responsibilities in Risk-Based Testing
- Crucial Aspects Of Superior Test Code Quality
- Streamline Your Cucumber BDD Tests with Gherkin Lint: A Comprehensive Guide
- How to Test Authentication and Authorization with Confidence + Best Tips
- Exploring the Three Scrum Artifacts: Grasping Their Essence and Effective Utilization


