Visual regression tests or visual testing is an activity performed by the testers to compare different versions of the screenshots taken from the application. A typical visual test would look like this:

- Take a screenshot of the application you are testing
- Save the screenshot and set it as a baseline
- Deploy the newest application version of the UI
- Open the application where you took the screenshot and compare it with the older screenshot
- If there are changes, save the newest screenshot as a baseline, if not, the initial baseline would be still valid
The flow looks pretty straightforward right? Well, yes if you are testing a couple of pages only once.
But what if we need to test a large quantity of application web pages or specific sections every single time there is a change on the UI? Doing that manually over and over again would take a lot of time for the testers to be able to have the needed resources to focus on other aspects of testing.
Automated visual regression tests using BackstopJS are one way to automate this process. The benefits are:
- Automatically compare screenshots
- Multiple viewports compatibility
- Screenshots from all webpages or specific sections
- Easy setup
- Comprehensive UI report
What is BackstopJS?
BackstopJS is an automated test framework that is written in JavaScript. It servers the purpose of automating visual regression tests, it is simple to set up and configure, and easy to understand. It has many components including the ability to render the DOM and all the elements through the command line, the ability to interact with the page as well as compare images in pixel differentiation.
Let’s show you how you can automated visual regression tests using BackstopJS in 5 simple steps!
Install BackstopJS
Assume that you already have Chrome and node.js installed on your computer, lets see how you can install BackstopJS. Globally install it on your computer using this command:
npm install -g backstopjsSetup and configure BackstopJS
Create a new folder structure, navigate to the project directory and run:
backstop init
This command creates a folder called backstop_data and also, will create a JSON file called backstop.json.
The JSON file will serve as the main confrontation for our tests. This would be the outcome of the command above:
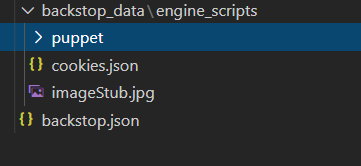
The initial configuration created in the backstop.json file is:
{
  "id": "backstop_default",
  "viewports": [
    {
      "label": "phone",
      "width": 320,
      "height": 480
    },
    {
      "label": "tablet",
      "width": 1024,
      "height": 768
    }
  ],
  "onBeforeScript": "puppet/onBefore.js",
  "onReadyScript": "puppet/onReady.js",
  "scenarios": [
    {
      "label": "BackstopJS Homepage",
      "cookiePath": "backstop_data/engine_scripts/cookies.json",
      "url": "https://garris.github.io/BackstopJS/",
      "referenceUrl": "",
      "readyEvent": "",
      "readySelector": "",
      "delay": 0,
      "hideSelectors": [],
      "removeSelectors": [],
      "hoverSelector": "",
      "clickSelector": "",
      "postInteractionWait": 0,
      "selectors": [],
      "selectorExpansion": true,
      "expect": 0,
      "misMatchThreshold" : 0.1,
      "requireSameDimensions": true
    }
  ],
  "paths": {
    "bitmaps_reference": "backstop_data/bitmaps_reference",
    "bitmaps_test": "backstop_data/bitmaps_test",
    "engine_scripts": "backstop_data/engine_scripts",
    "html_report": "backstop_data/html_report",
    "ci_report": "backstop_data/ci_report"
  },
  "report": ["browser"],
  "engine": "puppeteer",
  "engineOptions": {
    "args": ["--no-sandbox"]
  },
  "asyncCaptureLimit": 5,
  "asyncCompareLimit": 50,
  "debug": false,
  "debugWindow": false
}
The viewports are different screen resolutions that the visual test would run for a particular website URL. You can re-configure them. Add viewport for desktop screens:
   {
      "label":"Desktop",
      "width":1280,
      "height":1024
   }
The paths object is where our screenshots are saved. The folders are created after test execution.
bitmaps_reference is the folder where our baseline screenshots are saved. bitmaps_test is the folder where comparisons of two screenshots take place and it also stores any potential differences highlighting them with squared shape.
The last thing we need to do here is adding the scenarios. As you can see the initial scenario is the default one and it is created after we initialize the project. We can change the label and URL to what we want. We can add a new scenario for a specific URL within the particular website or a totally different website URL. For this post, we will leave it as it is.
Now we’re ready to run the test!
Run the initial test
The command for running the test is:
backstop referenceThe URL that we are hitting is https://garris.github.io/BackstopJS/ and we have three viewports, phone, tablet, and desktop resolutions. This command will save three screenshots in bitmaps_reference folder for the three different viewports. The output of the command is:
COMMAND | Executing core for "reference"
clean | backstop_data/bitmaps_reference was cleaned.
createBitmaps | Selected 1 of 1 scenarios.
CREATING NEW REFERENCE FILE
Cookie state restored with: [
{
"path": "/",
"name": "yourCookieName",
"value": "yourCookieValue",
"expirationDate": 1798790400,
"hostOnly": false,
"httpOnly": false,
"secure": false,
"session": false,
"sameSite": "no_restriction",
"url": "https://.www.yourdomain.com"
}
]
Browser Console Log 0: JSHandle:BackstopTools have been installed.
SCENARIO > BackstopJS Homepage
Browser Console Log 0: JSHandle:BackstopTools have been installed.
SCENARIO > BackstopJS Homepage
x Close Browser
Browser Console Log 0: JSHandle:BackstopTools have been installed.
SCENARIO > BackstopJS Homepage
x Close Browser
x Close Browser
Run `$ backstop test` to generate diff report.
COMMAND | Command "reference" successfully executed in [5.532s]And three different screenshots are saved in the bitmaps_reference folder that just got created during execution (phone, tablet, and desktop).

Compare two screenshots
Since we already saved our baseline images for different device resolutions, we are ready to compare those baseline images with the newest ones. The command for image comparison would be:
backstop testThe outcome of this command is:
      COMMAND | Executing core for "report"
      compare | OK: BackstopJS Homepage backstop_default_BackstopJS_Homepage_0_document_0_phone.png
      compare | OK: BackstopJS Homepage backstop_default_BackstopJS_Homepage_0_document_1_tablet.png
      compare | OK: BackstopJS Homepage backstop_default_BackstopJS_Homepage_0_document_2_Desktop.png
       report | Test completed...
       report | 3 Passed
       report | 0 Failed
       report | Writing browser report
       report | Resources copied
       report | Copied json report to: ~\backstop_data\bitmaps_test\20210201-123652\report.json
       report | Copied jsonp report to: ~\backstop_data\html_report\config.js
      COMMAND | Executing core for "openReport"
   openReport | Attempting to ping
   openReport | Remote not found. Opening backstop_data\html_report\index.html
      COMMAND | Command "report" successfully executed in [4.538s]
      COMMAND | Command "test" successfully executed in [10.109s]
This is showing us that the UI has not been changed and the images are the same. That’s why we have 3 tests passed for all of the screenshots.
Three images are created under bitmaps_test folder.

Since those are the same as the previous ones then we conclude that our UI application page has not been affected by any change made by the developers.
Repot is automatically generated:
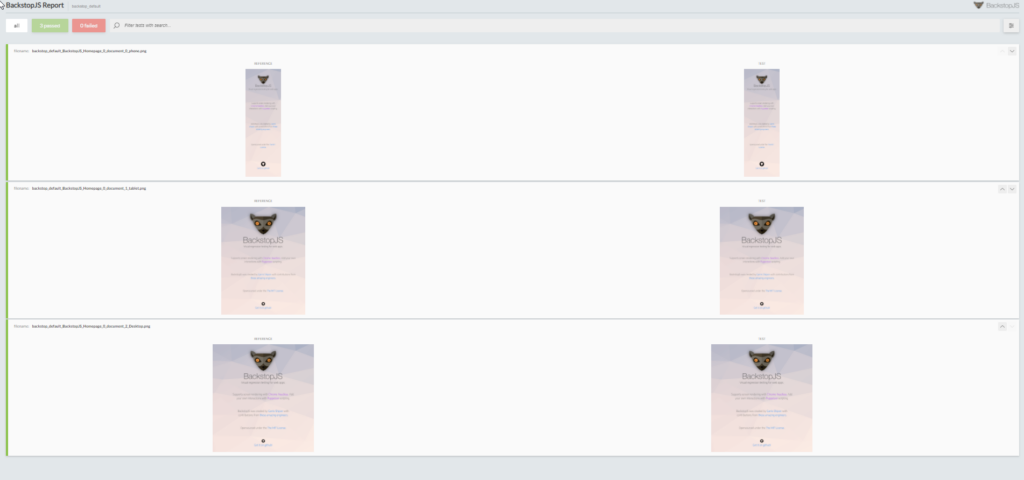
The report shows all the tests that have been executed as well as all of the screenshots that’ve been compared.
Save new screenshot as a baseline
Since there are no changes in the UI, we don’t need to save the newest images but just for the purpose of showing how you can store those screenshots we are going to save them, using the command:
backstop approveThe output from the command above would look like:

All of the newest screenshots from the bitmaps_test will be promoted to bitmaps_reference folder and would serve us as a baseline for upcoming test comparisons. This would be the case if the design has changed. In some situations, the UI may be broken and after we notice that the images are different, we need to coordinate with the developers and address the issue accordingly. In that case, we would not save the new screenshots since it is a bug, not a change request or a feature.
Conclusion
Visual regression tests have never been so easy and straightforward. The constant effort provided by experts in the field and from the community itself, allows us to take advantage of the tool’s functionalities and benefits. Visual regression tests using BackstopJS is one way of automating these kinds of tests. There are other tools for this purpose like Aplitools or Wraith. What tools would you use is based on your predefined strategy within the project.
Share This Post
Latest Posts
- Test Analyst’s Responsibilities in Risk-Based Testing
- Crucial Aspects Of Superior Test Code Quality
- Streamline Your Cucumber BDD Tests with Gherkin Lint: A Comprehensive Guide
- How to Test Authentication and Authorization with Confidence + Best Tips
- Exploring the Three Scrum Artifacts: Grasping Their Essence and Effective Utilization


