If one thing can be noticed on a web application, that’s the structurally organized UI elements. Even one small visual deformity can be easily noticed. When we change the style of our app or add something new, we must be aware that it can affect the layout of the page. The impact varies on the type of change done on the application. One example is when we do a small change on our left sidebar and for some reason that change affects our main content position.
No matter the complexity of the newly introduced feature or a change, it can cause damage that can affect your page responsiveness, usability, ease o use, etc. But there is a solution to this. It’s called Visual Testing.
Understand Visual Testing
Visual Testing is a testing activity where we compare the expected web page design with the actual design as a testing outcome. In other words, we are comparing any element correctness, positions of the elements, layout on-screen positioning, content correctness, etc. Basically every small detail in the UI compared to the expected design. Visual errors happen often and Visual Testing assures that any change, even in the small pixel can be noticed, reported, and fixed accordingly.
Visual Testing vs E2E Testing
Many would say why are you performing a separate testing activity and storing the results in a separate module where we can do that and do the functional E2E testing in one centralized place?
In E2E testing we are testing the whole application flow. And yes, the web page is a part of that flow but we are only interested if the functionality of the application works as it should. We don’t put any focus or effort to test the UI elements. Maybe the functional part was working perfectly but if you have a couple of elements that should’ve been aligned together and were not, then you have a visual error to report. When performing E2E testing, a human eye cannot notice the difference in the position in pixels for one input field but it can affect some smaller or bigger screens.
When performed, Visual Testing can detect those types of differences easily. This is especially true for complex web applications with many web pages and a large content included. You definitely want to perform the Visual Testing as a separate task and include in the DoD as part of the front end features.
How is performed?
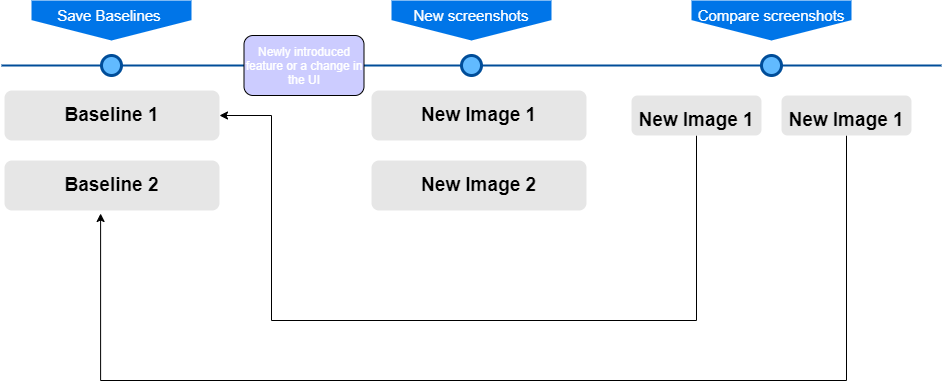
We don’t want to use the functional testing for detecting the visual defect since the purpose of the functional testing is not focusing on the UI elements. Visual bugs are mostly rendering issues and any functional testing tools are not designed to catch those types of bugs. Software giants like Google Instagram, Amazon have reported many visual bugs so they strive for perfect UI responsiveness and optimization. Two options are in the table to perform Visual testing. Either opt for a Manual or Automated way.
Manual Visual Testing

Starting with the manual way, an experienced QA engineer is comparing the designs of the actual vs expected output by catching screenshots from every part of the affected web page. It’s like you are playing a ‘spot the difference’ game. Let’s say that you need to compare two screenshots to find 5 differences. Assume how long it would take you to find them all since they may be very small differences that cannot be detected so easily.
What if you need to compare 20 screenshots with many unknown differences?
You need to invest your time to ensure that you’ve caught all the issues. It is a starting point when an organization is introducing Visual Testing in their testing activities but it must be automated at some point. That’s not all. Don’t forget that there are different browsers you need to perform this and the different device resolutions. If you do the math it will turn out that you need a huge amount of testing effort just for one web page on different browsers and devices. But don’t worry, since we can automate all of that.
Automation Visual Testing
Automated Visual Testing is using software to automate the process of comparing screenshots taken from the web pages itself. It can be integrated within your E2E automated tests as well. Every step of the test is screenshot-ed and stored for comparison. Since it evolves from the E2E testing, Visual Testing can compare many screenshots by using only one assertion which is comparing all the actual screenshots with he previously-stored baseline screenshots.
Even if there is only one small pixel as a difference, the software can catch that and report it to the QA engineer. That’s why many companies strive for an automated way in the long term to improve their overall testing effectiveness.
There are many tools you can work with, starting from BackstopJs, Aplitools, protractor-image-comparison, and many more. All of these are based on the same concept, comparing the screenshots but they have different syntax.
Aplitools for automated Visual Testing
One that catches my eye is Aplitools. It’s a software for running Visual tests across every app, browser, operating system, and screen size. It has many SDKs for all major programming languages and frameworks. With one line of code, you can enhance the visual tests with powerful screenshot assertions across different platforms.

Its Visual AI detects differences instantly when navigated to a web page. One of its best features is that it can resolve thousand of differences for all of your tests and automatically generate a report with all the changes that need to be done in order to have a 100% screenshot match.

The Bottom Line
Visual Testing should be an integral part of every front-end feature. No matter if you are performing it in a manual way or you opt for some of the powerful software tools out there, it would definitely ensure the quality of the applications is at the point. Many companies lack resources for this type of testing as they are focusing on the behaviour of the app. But ensuring that the UI of the application is stable, is also an important part since that is the first thing a user would see on your web page.
Share this post


