Having automated tests in a software project is essential to confirm the working functionality but also find bugs quickly. This happens early in the development lifecycle for example if a new feature is being developed, testers or developers can run their regression tests in order to find potential bugs or irregularities in that particular feature. Larger the number of automated tests covering all the possible causes, the smaller the chance of discovering bugs late in development which would be very costly to fix and release.
Although this may seem like an easy process, there is always a chance that a tester can write poor automation tests or tests that are not understanding/structured enough. For example, if you have an element located and it is defined in multiple tests, only one change is needed in order for us to go through all of these affected tests to change it accordingly. This can be time-consuming, not reusable, and not readable enough.
This post will be focused on how we can improve all of that by using the Page Object Model in test automation.
What is Page Object Model (POM)?

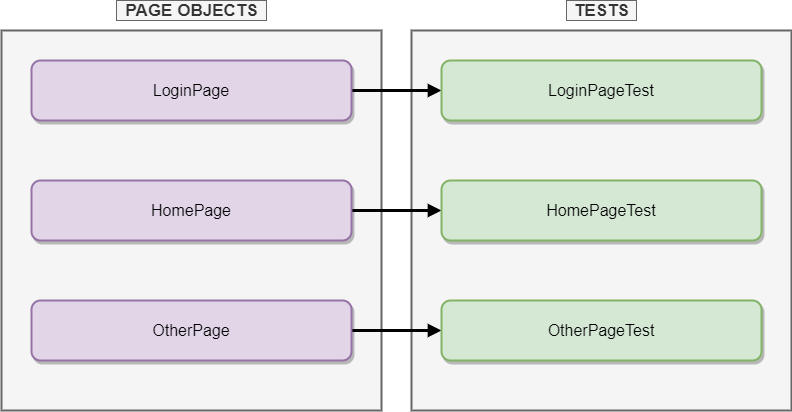
Page Object Model (POM) is a design pattern used in test automation that allows writing less code that is reusable, improves the process of maintaining the tests, and provides a better test structure. Basically, the concept behind the page object model is having a separate object class that contains all the methods that interact with the UI of the page. The tests are using these methods from the page object class and as a result, we have separate files for the tests and for the page objects instead of all methods, elements, and tests gathered in one single file.
If something is changed in the functionality that affects the interaction with the page, only the methods affected will be changed in the page object, the tests would remain the same. Plus, the page object can be reusable throughout multiple test files because it can contain common methods that are utilized across several UI pages. With this, we are achieving the wanted level of reusability, readability, and maintainability.
Advantages of POM
The advantages of using Page Object Model (POM) in the test framework are:
- Avoid code duplication and having reusable methods
- Separate tests and objects
- Making more readable tests
- The test structure is easy to understand
- Page object can be reused across multiple test projects
- Change in UI can be easily updated
- Having element locators separated from the tests
How to create POM in test automation?
Let’s take a Protractor framework as an example and we will be using Typescript to write the code. We’re going to create a couple of things in order to achieve a good POM structure.
First thing we going to do is create a new project. Inside that project we create a couple of folders:
- page-object – All methods that interact with the AUT are placed here
- tests – The actual tests we’re going to execute against the AUT
- locators – Element locators that will be used in the methods
- data – Test data that will be needed for assertions or as a passing value
- util – Any date conversions, string conversions, or helper methods are placed here

page-object
export class PageObject {
public async navigateToWebsite(){ await browser.get("{{WEBSITE_URL}}") }
public async clickOnButton({ await ElementHelper.waitForElementToBeClickableAndClick(Locators.button); }
public async getElementText() { return ElementHelper.returnElementValueIfDisplayed(Locators.field); }
public async enterTextInField(inputText: string) { await ElementHelper.clearInputFieldAndType(Locators.field, inputText); }}
From the code above we can see that a class named PageObject has been created. Inside that class, we have several asynchronous methods:
- clickOnButton – Wait for the element to be available in the DOM and click it
- getElementText – Wait for the element to be displayed on the page and get its value
- enterTextInField – Clear the input field and enter specific text
The ElementHelper is a util class that is consists of wrapped methods for UI interaction. Locators is a different file that has all the locators that we need.
tests
This file consists of all the tests we are going to run. All of the methods in this file are taken from the page object.
describe('Test Example', () => { it('Should validate text when input field is submitted', async () => { await pageObject.navigateToWebsite(); await pageObject.clickOnButton(); await pageObject.enterTextInField(); await pageObject.clickOnButton(); const actualText = await pageObject.getElementText(); expect(actualText).toEqual(Data.expectedText);}); });
Using the Jasmine framework we are creating the test using one describe block and inside we have one it step which is the actual test.
Navigation to the website, click on a button, entering some value, submitting the changes by clicking a button again, and finally, getting the value and asserting it using Chai Assertion Library.
locators
In the locator’s file, we are storing all the locators that we need in order for our tests to work as expected. The locators are the elements on the webpage with which we interact.
export default { button: $("[aria-label='button']"), field: $([type='field']"), inputText: $("select[name='input']") };
The $ sign is a short syntax for CSS selection in Protractor, so basically we are getting the elements by their CSS values.
data
This is just a simple file with one variable which in this example is:
export const expectedText = "Text is entered!"
This file can be ignored if you have just a couple of test data variables to work with but for large data files, I suggest grouping them into a separate class like this.
util
This file serves us as a wrapper of all common methods that are used across multiple page objects. Even though this can be avoided and all of the methods can be written in the page-object file itself, having this file allows more structured common methods that are easy to understand.
export class ElementHelper {
public static async clearInputFieldAndType(selector: ElementFinder, text: string) { await this.waitForElementToBeClickableAndClick(selector); await selector.sendKeys(text); }
public static async waitForElementToBeClickableAndClick(selector: ElementFinder) { await browser.wait(ExpectedConditions.elementToBeClickable(selector), 10000); await selector.click(); }
public static async returnElementValueIfDisplayed(selector: ElementFinder) { await this.waitForElementToBeVisible(selector); return selector.getText(); }
public static async waitForElementToBeVisible(selector: ElementFinder) { await browser.wait(ExpectedConditions.visibilityOf(selector), 10000); }}
Methods like waiting for the element to be visible, getting the text, clearing the content of a field, and entering a value. All of these are coming from the Protractor framework itself and can be used for many page-object files.
Summary
I hope that this post gave you a more clear picture of what is a page object model, the advantages of using it, and how to follow and implement this pattern in your test automation. There are many variations of POM but whichever you choose would satisfy the automation framework strategies and goals.
Share this Post
Latest Posts
- Test Analyst’s Responsibilities in Risk-Based Testing
- Crucial Aspects Of Superior Test Code Quality
- Streamline Your Cucumber BDD Tests with Gherkin Lint: A Comprehensive Guide
- How to Test Authentication and Authorization with Confidence + Best Tips
- Exploring the Three Scrum Artifacts: Grasping Their Essence and Effective Utilization


